 |
| The turn signal way up there on the dash. |
Driving an older car in some ways is like learning to walk again. All the familiar workings of modern cars are missing and replaced by what can be a bewildering array of "not obvious" replacements. One of these in the MGA was the turn signal. Of course it's not a control arm attached to the wheel on the left side as in all modern cars - that would be too easy. The control is a lever on the dashboard that you have to take one hand off the wheel to reach. When I first got it I wasn't sure how the thing was supposed to work, other than that pushing it one direction or another obviously made the corresponding blinker flash. However, as
received when you pushed it to the left or right and held it the signal functioned, but stopped immediately as soon as you let go and it was a real pain to try to hold the signal through a turn. It wasn't very safe and it slowly dawned on me that it couldn't be the way it was meant to work.
As it turns out the unit hidden just behind the dash was malfunctioning. In the MGA and many cars of the period
this contraption is an "Electropneumatic Trafficator Timer". Turns out,
it's a little pneumatic piston that once pushed one direction or the
other is supposed to slowly hiss back to the off position over an
adjustable period of time - 20 seconds being the apparent norm. It's
basically like the "slow close" mechanisms on screen doors or on modern
high end cabinets.
Removing it was easy - the front knob is held on with a small chrome screw right on the front of the unit, and then the knob pulls off. It's a tight fit to a hexagonal shaft, but mine came off with a firm pull. Then there are three wires connected to posts on the back. I wrote down the mapping of wire colors to post markings, loosened the capture screw and pulled the wires off. They're old but in fine shape. There is a set screw on the back that controls the air flow and shortens or lengthens the signal time. Not that easy in my case - the screw was already all the way tight, and gently extracting the cotton plug behind it with a needle, fluffing it and re-inserting as recommended on the web did not help.
MGA Guru to the rescue:
this page describes all you might need to know about taking this little cannister apart and rebuilding it in six pages with pictures. There is a lot of overlapping content but other good advice and pictures
here. So all told probably an hour or two to take the thing apart, shim out the worn thin leather washer on the air piston with a piece of paper cut to size, and re-lubricate it with grease (I just used Vaseline actually). The only tool necessary was a screwdriver. Really cool. I love that this is something that could be repaired simply
when it fails instead of having to replace. After spending my days
working in high tech, it's a lot of fun to get to work with a little
"low tech". Replacement units are $140, this cost a total of $1 (the cost of the Vaseline since we were out). I'll sell you the rest of the jar for $ 0.99 if you want.
As a prize for helping me with the rebuild, I took my son (the 11 yr old middle child) for a joy ride and up to the store to get the jar of petroleum jelly and had a "mall cop" pull up next to us as we got back in the car. We both froze up a little wondering what kind of trouble we were in, and I was even worried he was going to say something about the still unregistered car (oops, published this one out of order - it was still not yet fully "legal" when we did this repair), but all we got was a compliment - "thanks for keeping her on the road".
For the ultra curious, or those who need to do this repair themselves, here's a little photo essay on the procedure:
 |
| The front of the unit as it came out of the dash. The hex shaft on top is what the knob attaches to. The three screws holding the outer case on have been removed in this photo. |
 |
| The back of the unit. The three posts around the outside are where the wires attach. I think they are labeled L for left, R for right, and B for battery. The set screw in the middle controls the release of air. Removing it and fishing carefully with a sewing needle can remove the cotton plug, but that was actually harder than just disassembling the whole thing. Once disassembled you can push the cotton out from the inside to inspect or replace it if necesssary. |
 |
| After removing the three screws on the front, the inner unit just slips out of the outer case from the back. |
 |
| The front of the unit with the outer case removed, showing the working bits. Turning the shaft either direction pushes the copper on one side to make contact with the appropriate post, connecting battery power from the top to that side. If the piston works but the turn signal doesn't come on, cleaning these parts might be an easy fix. I think it is possible to mistakenly put it back together at the end so that the posts are labeled
wrong, but it's fairly obvious which post should go where looking at the
working end here, so just a little paying attention is all that's needed. |
 |
| To get to the piston you have to remove three more screws from the front, these ones going through the electrical connections points. |
 |
| The screw runs through the body to the back where the wires from the car connect. The unit is spring loaded. Not a lot of force, but it would spring apart if you're not careful. You can see the pressure on my thumb hold the top down during dis-assembly to keep it from springing apart, and to keep from stripping a screw if the top is allowed to push out too much on the side already loosened. |
 |
| All screws loose and the piston coming out. Shows about where the spring stops pushing. |
 |
| A little further apart, showing the leather washer. One of the hex posts for the electrical connection can be seen in the lower right having fallen out. That is not a problem - they are only held in by the screws that have been pulled out. You need three thumbs to hold it all in place on reassembly though. |
|
 |
| The spring inside the piston chamber. Mine didn't want to come out so I didn't bother but I've seen pictures of others removed. |
 |
| The piston itself, showing the leather washer being pulled away. It was very dry and apparently had worn a little thin over the last 50 years of rubbing past the plastic chamber. |
 |
| The back of the piston - showing the smooth side of the leather. The rough side faces out and so is the active side. |
 |
| The various bits and parts of the inner working parts disassembled. That is some kind of interesting desert in the background made by my daughter... |
 |
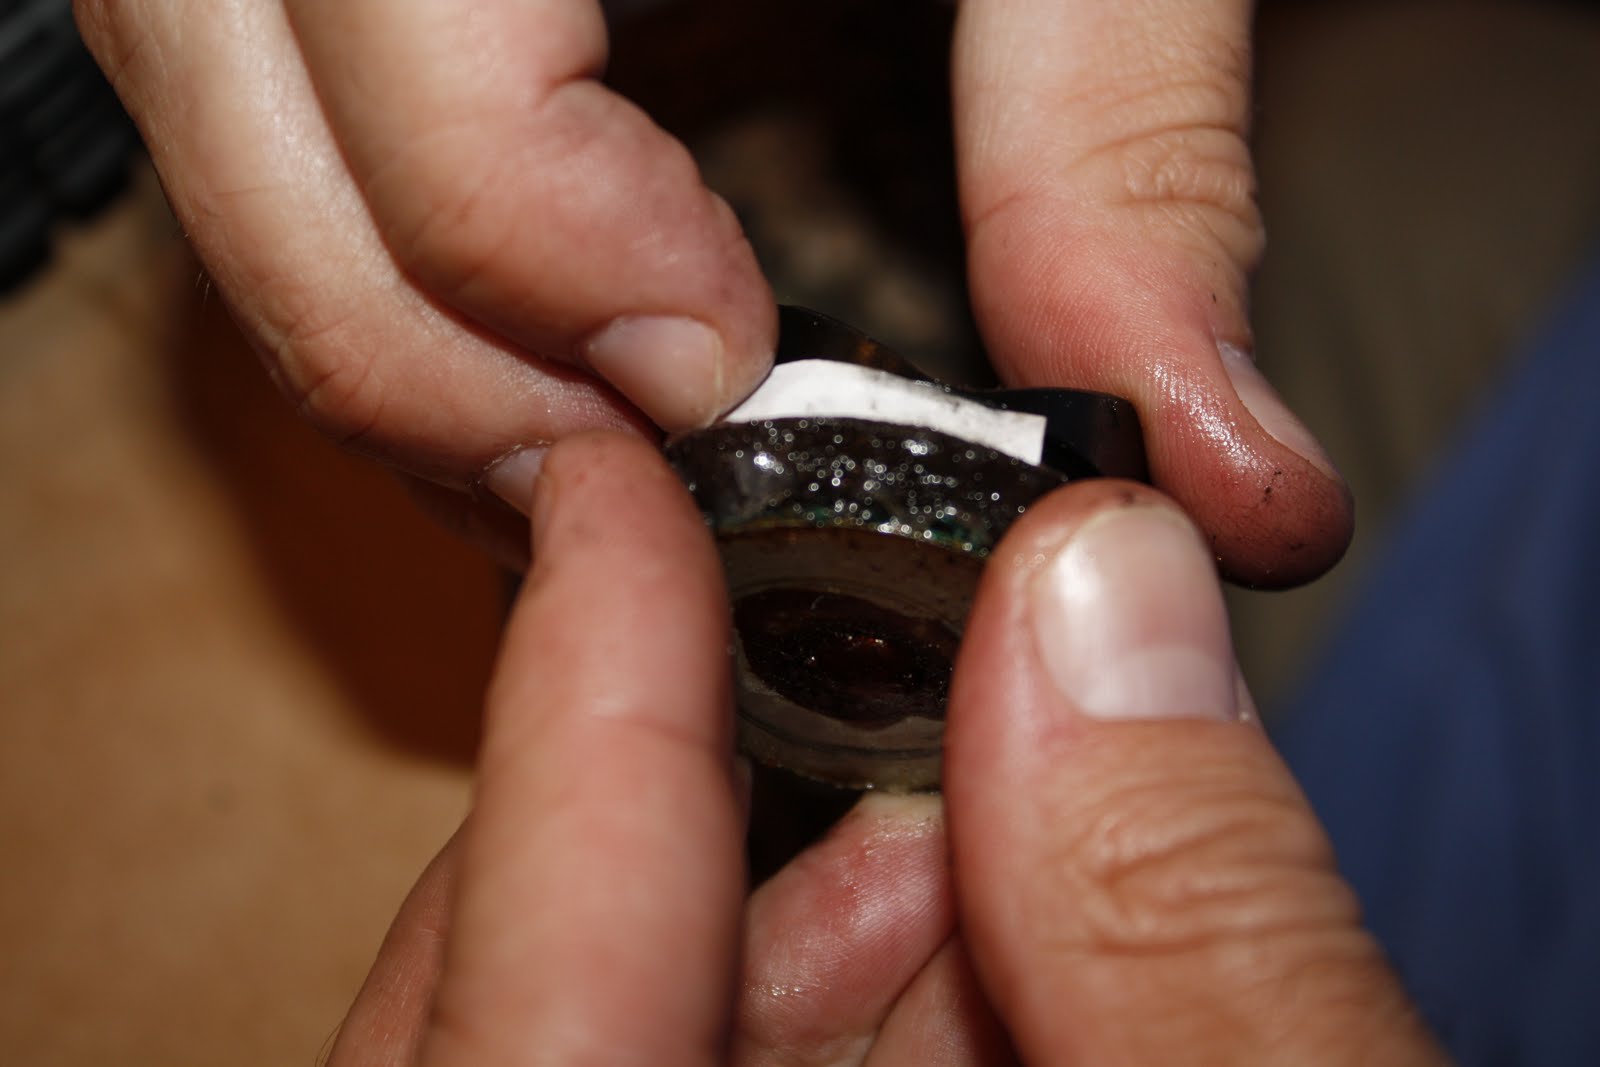
| The strip of paper I used to shim out the leather. I only decided I needed this after lubrication and reassembly didn't give a slow enough piston return action. You can see the rivet that holds the leather piece on. It would be a real pain to replace the leather, but I have read at least one person's experience doing so. |
 |
| Inserting the paper shim. I probably should have used an index card as this was a little thin. It also got hard to force the paper in once it got soaked in the grease. As I recall, this strip as shown was also too wide - I had to cut it down so it didn't protrude past the leather. |
 |
| Just about in - this is probably the point at which I discovered I needed to trim the paper, but you get the idea. The spring makes reassembly a little challenging but the whole project is easy for the moderate do-it-your-self-er. I think this is the dirtiest my fingers got in the whole process - as you can see it's not a terribly messy process. |
|
I think the same basic type of unit is used on most British cars of the period. I hope this helps someone venture in. If you try this out, let me know!


No comments:
Post a Comment